InteractivePrototype-Group:Orquesta
From CS 160 Fall 2008
Report
Each team member’s name and role in this assignment
- Stuart
- Implementation
- Report and Presentation Writeup
- Presenter (talk)
- Anthony
- Implementation
- Report and Presentation Writeup
- Presenter (talk)
- Jimmy
- Implementation
- Report and Presentation Writeup
- Vedran
- Presenter (talk)
- Report and Presentation Writeup
- Greg
- Implementation
- Report and Presentation Writeup
- Presenter (computer)
Problem and solution overview
Professional music software is generally an overwhelming experience for a novice. The vocabulary within menus, the different options, and the visual interface can be more confusing than helping. Orquesta created a fun and simple game where the user creates complex compositions without needing to purchase expensive hardware equipment. Through various objectives, the levels in the game gradually introduce the user to the art of DJ’ing, while enabling the user to develop the skills needed to create a complex track. Through volume, transition timing, and beat management, the user creates his own track which can be saved for his friends to enjoy.
Tasks
- Complete the tutorial (medium)
In order to familiarize himself with the application, the user goes through a brief tutorial. The tutorial is accessible from the main menu start button, which displays a list of the game modes, one of which is the tutorial mode. While the user is going through the tutorial, descriptive dialog boxes explain and sequentially guide the user in how to perform the various actions in the Orquesta game.
- Successfully complete two transitions in Campaign Mode (hard)
Level one has three possible objectives, all transitions between instruments (turning one instrument off, or another one on). The levels are accessible in campaign mode of the game. Prior to starting a level, the user chooses which instruments he is will be using. As soon as the level has started, the music starts playing and the user’s task is to make transitions between the instruments that he chose before the level start.
- Save a music file (easy)
To save a music file one needs to click on the save button, that is accessible on the Main screen. A save option is available by pressing the “stop” button in the game, which brings choose the appropriate folder and a name for his file, and save it on his machine.
Revised interface design
Changes as a result of low-fi testing and rationale behind the changes
- SAVING
The problem with the save action was that it was not clear how nor was it clear where to save. We solved that by including a note on the instruction screen, saying that a track can be saved on upon a "stop" action or on the statistics screen (see: Storyboard of Tasks: Saving & Transitions). Also, the save feature clarifies that the action would save the track, and not the overall progress in the game. The user can save his composition at any time during game-play, while before it was necessary to go through the entire level and save the track only on the results screen. Also, there is a save functionality added in both the campaign and practice modes of the game.
- OBJECTIVES
In order to make it a game, we gave the user a number of chances to get the objectives right. Therefore, in case the user is confused, an action wrongly performed action will not be penalized by an “objective fault”. Instead the trial and error technique (see: Storyboard of Tasks: Tutorial) will help the user stumble upon the right action eventually (unless he intends to fail), successfully completing the level. The objective in the first level was for the user to make successful transitions between instruments. The intention behind that objective was to simulate the core of the DJ environment: that the music is not necessarily interrupted by the end of the track. The problems were that some experienced DJ’s wanted to be free of all constraints, and not have to do the transitions on-beat. However, the one of the primary objectives of this game is to teach basic DJ skill of how to follow a beat. Our solution was a compromise between the two: the transitions in practice mode can be done however one wants. In that mode there will be no penalty (in form of “strikes”) for off-beat transitions. Also, in advanced levels, we would introduce advanced transitions, which need not / must not be done on beat.
- VISUAL ELEMENTS
A notable issue of the lo-fi interface itself was the lack of visual feedback, in terms of labeling the functions (since the primary output in the game is sound). We corrected that issue by adding labels to the appropriate selectors, functions, and function categories, while not overwhelming the interface with cumbersome text (see: Storyboard of Tasks: Transitions).
- LO-FI SPECIFIC ISSUES
The limitations of the lo-fi prevented us from efficiently deliver several functionality issues. For instance, playing the music on beat was almost impossible to synchronize, since the lo-fi was done on paper, and the game's primary output is music. Also, the responsiveness of the application was hard to simulate: the user would press a button, and wouldn't understand why some action happened. That was due to the latency of the "computer" presenter. Since the interface is now created in flash, we are rid of those problems.
The second big problem of the lo-fi was telling whether a part of the interface is a clickable, since the panels, buttons, and slides were pen on paper. The flash interface solves those problems in the way that the clickable buttons or areas visually "stick out" of the screen. That is necessary to distinguish the static elements of the screen.
Sketches or scripts for unimplemented portions of the interface
Refer to "Wizard of Oz Techniques."
Storyboards of tasks
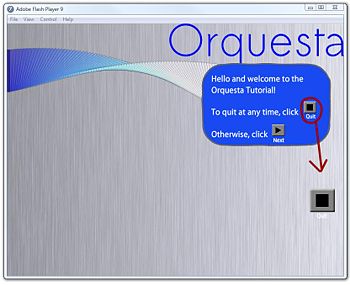
- Tutorial:
The user starts the tutorial by clicking "Start" button and choosing the "Tutorial" mode. The tutorial starts with the screen presented below:
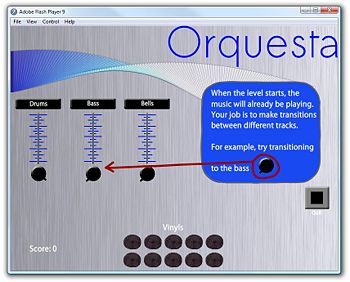
Clicking "next" on the previous screen will display the screen presented below. There the user will be prompted to make a transition to bass:
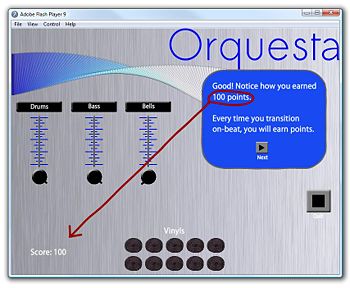
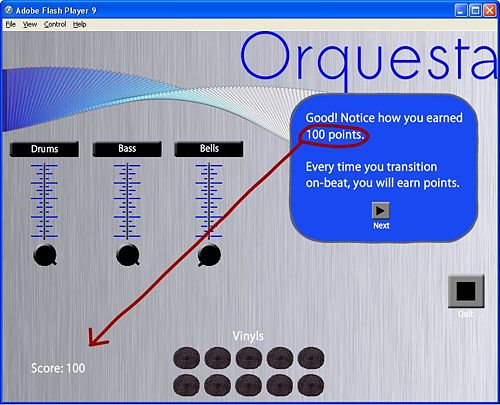
The user's attention will be directed to the points that he just earned by transitioning to bass:
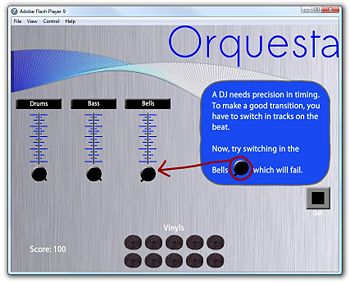
The user will be prompted to make a transition off-beat intentionally, in order to familiarize himself with the on-beat transitioning concept:
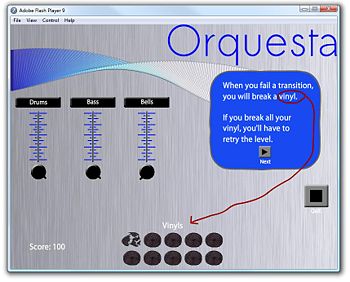
The user's attention will be drawn to the "strikes" section, while the dialog box above (in blue) explains the penalty system:
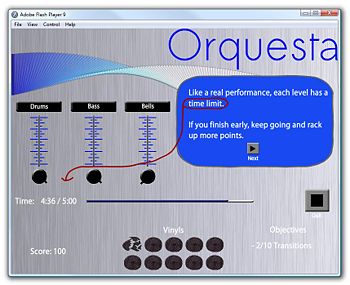
The user will be notified that there is a timer to a mix:
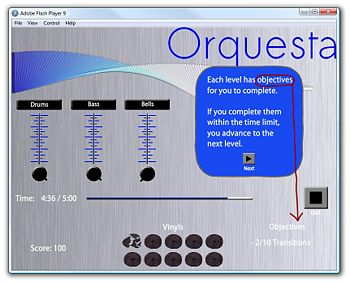
The user is informed about the purpose and the contents of the objectives section:
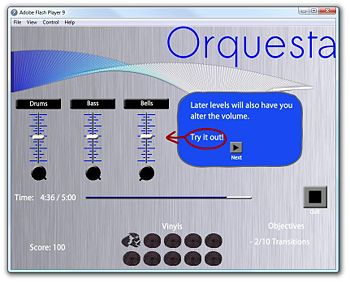
The user will be prompted to chnge the volume of the track:
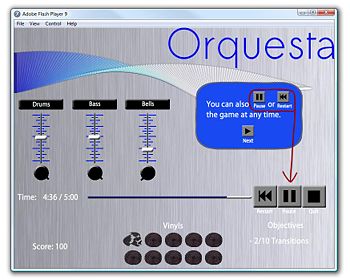
To learn the controls, a brief explanation of restart, pause, and stop functions is provided:
- Transitions:
To transition between two instruuments, one would first have to select which instruments are being used. The selection is done after choosing the game mode, on
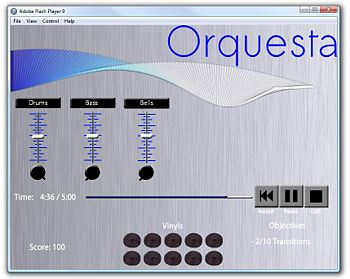
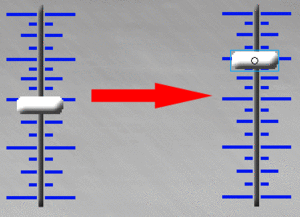
The transitions are done in the Mixing screen, by clicking on the knobs below the volume bar of each instrument. The button indicates on or off, as presented on the picture below:
A successful completion of two transitions would display a statistics screen in Campaign mode:
- Saving:
Saving the mix could be done in two ways: 1) By clicking stop in practice and campaign modes 2) By completing level objectives in campaign mode, and saving from the Statistics screen
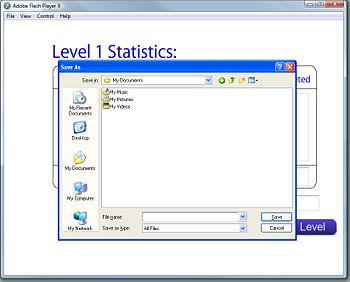
Either one of those options brings up the following prompt:
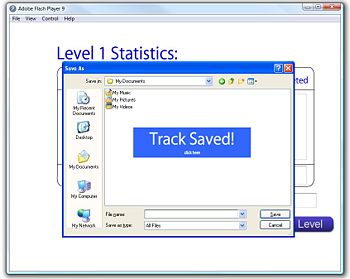
Save is indicated by a Clear message "Track Saved". The user is prompted to click on the message to continue
Prototype overview
You can play Orquesta online right now by visiting this page. You can also try this alternate link. You can view instructions for downloading and installing Orquesta on your computer by viewing our readme file here.
An overview of the prototype is presented below.
Main Menu
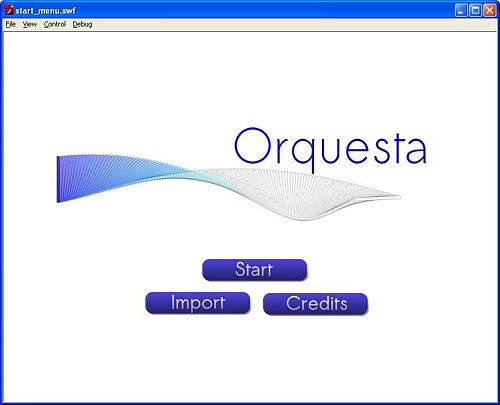
The “Main Menu” is the first screen shown to the user (figure 1). From here the user may choose from one of three options: (1) click the “Start” button to play the game, (2) click the “Import” button to load a previously saved composition (figure 3), or (3) click the “Credits” button to view the list of contributing developers. Each of the buttons have been for the most part standardized throughout the application. Upon hovering the mouse pointer over any primary button, the button will glow with a soft white tint to indicate this particular button may be pressed.
Mode Screen
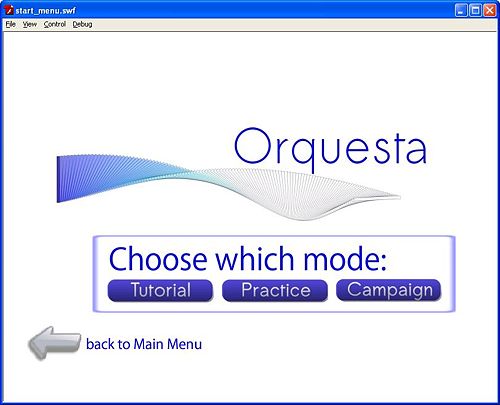
Upon clicking the “Start” button, the user is propelled into the “Mode Screen” depicted in figure 2. From here, the user is able to choose between 3 modes: (1) “Tutorial”, (2) “Practice”, and (3) “Campaign” or click the arrow indicating it will return the user to the main menu. Tutorial mode will show the user precisely how the game interface works. From activating a particular track, to modifying the corresponding volume of that track, in addition to how the user must complete a set of objectives for each level, to proceed to the next. Practice mode will allow the user to experiment with the user interface, without the requirement of completing objectives in comparison to campaign mode. Finally, campaign mode is the primary Orquesta interface, where the user will be required to select a set of instruments, complete a set of objectives, and be allowed to proceed to the next levels contingent on completing those objectives.
Instructions Screen
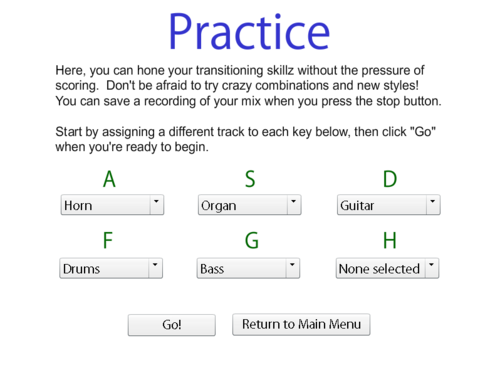
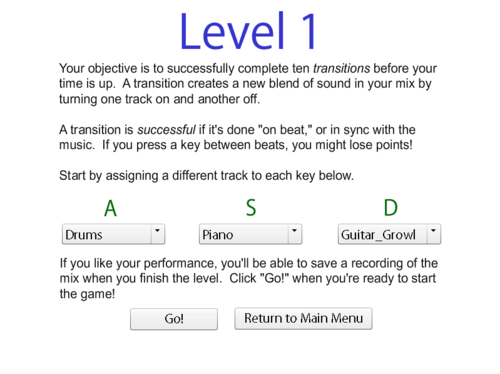
The instructions screen appears after the Mode screen if either Campaign or Practice is selected. This screen serves several purposes:
- Gives the player information about what mode they've selected
- In Campaign Mode, gives information about the level objectives
- In Practice Mode, encourages experimentation
- Allows them to select which tracks they want to mix
- Tells them how to save a recording of their mix
- Provides a chance to go back if this isn't what they intended to do
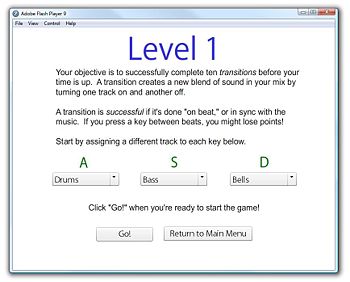
The Practice Mode instructions screen appears below, followed by the Level 1 instructions screen for Campaign Mode.
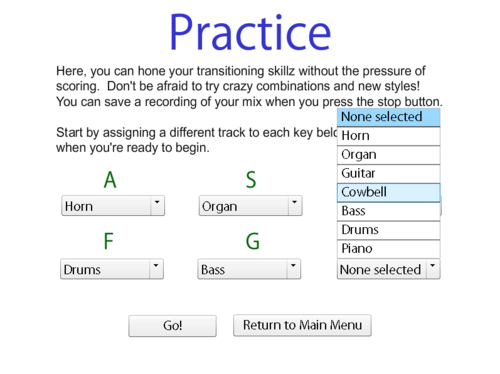
Track selection is very simple, and uses the standard UI affordance of drop-down menus (in this case, the drop-down menu actually "pops up" out of the button because of space constraints). The player clicks on the button corresponding to the desired key, and the menu pops up with a list of the available tracks. From here, they can assign a track that will be toggled on and off by that key while beatmixing in the game.
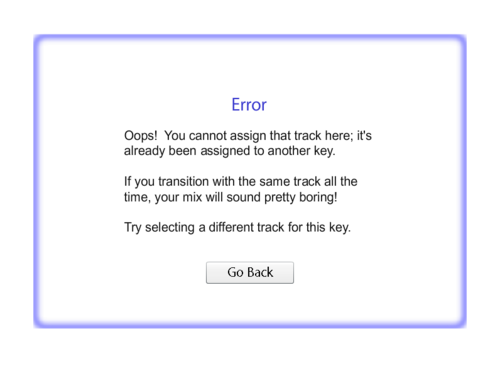
If the player tries to assign the same track to multiple keys, an error appears. This is because one of the main objectives of beatmixing is to create new blends of sound - if a player tries to "mix" tracks that all sound the same, they won't go too far in the DJ world. If the user wants a stronger sound from one of the tracks, they can simply raise its volume in the mixing screen.
Once the player has selected their desired tracks, they can click "Go!" to begin the game, which will immediately load the mixing screen and start the timer (if in Campaign Mode).
Audio Implementation
To implement the audio, we downloaded various sample tracks from looperman.com. We looked for a variety of different sounds around the same beats per minute that would potentially sound interesting layered on top of each other. These tracks were all filtered and configured to 115 beats per minute, thus making it easy for looping and layering, and all volumes were matched up as close as possible. This was all done in an external program called Sony Acid Pro 6.0 to facilitate the layering aspects of the game, so that everything sounds smooth and is of equal length.
In terms of Action Scripting, we ran into lots of conflicts with conflicting versions of action script because many tutorials online fail to specify which version of action scripts they used. For the whole project, we decided to use Action Script 3.0, which has many new sound libraries and features that could potentially allow us to add in many more functionalities later. In the end, we implemented a wrapper class that handles all the tools we need, in terms of loading the tracks from the right path, controlling the volumes, and playing and stopping the individual tracks. To keep consistent loops, ALL tracks are played at the same time and looped continuously. Essentially, in terms of implementation, “playing” a song(or turning a song on) means to make the volume to be audible, where as to stop a track, it turns the volume off, but the song is still playing in the background just to keep consistent positioning. Therefore, if a song is to be turned on later, it will play at the correct time.
The available instruments are listed and selected right before we enter campaign mode. They are then passed as string arguments to access the file paths in the game’s implementation screen. Afterwards, all the sounds are loaded and in the practice and campaign modes, sounds are started upon initialization. All volumes start at 0 except for the first one.
Game Screen Features
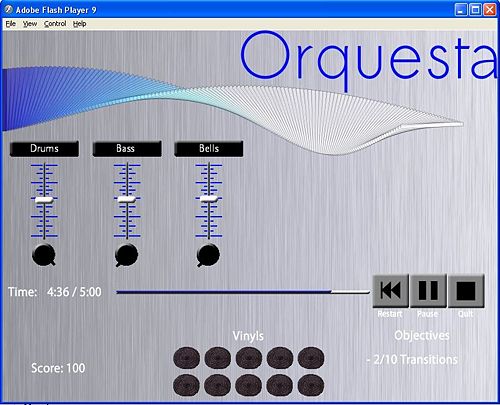
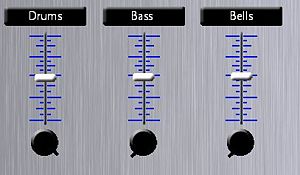
In terms of our game implementation, a neat feature that we have is volume control. This is mainly for artistic preferences so that people can hear tracks louder/softer in accordance to their preferences. We also have dials to have a visualization in which users can see when their tracks are on or off.
Import Screen
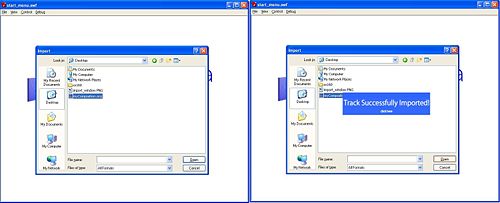
The import screen (figure 3) will allow the user to import tracks which have been previously saved on the local file system. This is a traditional open file dialog for the user's operating system. Upon clicking the “Open” button, a dialog will pop up confirming that the file was in fact loaded successfully. Next, the user is taken into a modified Orquesta game interface, where the user is able to play back the composition with the traditional user controls disabled. The idea is that, if in the midst of a campaign, a user wants to show off a snazzy track to a friend, he/she can save that track and then later import the track to play it back at another time.
Credits Screen
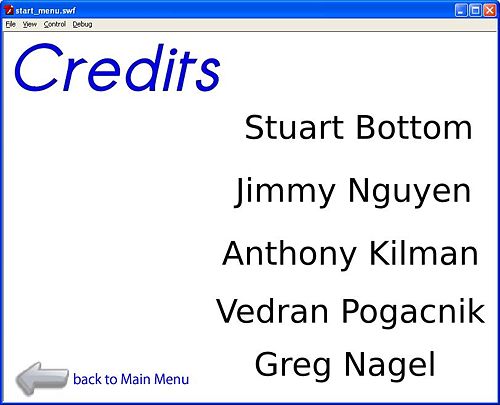
The “Credits” button will take the user to a screen displaying the names of the contributing developers (figure 4). The screen itself is straightforward, and there is a single button allowing the user to return to the main menu.
Statistics Screen
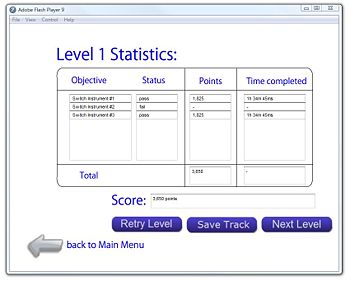
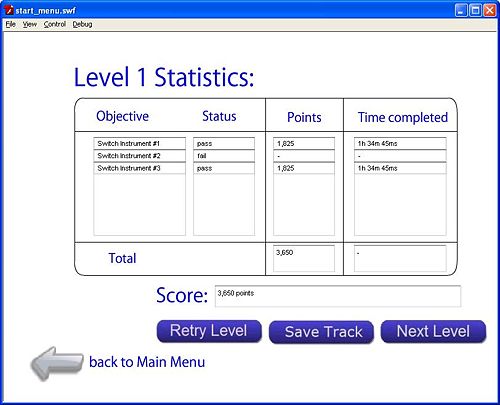
The statistics screen is presented to the user once they have completed a level in campaign mode (figure 5). This screen is a bit more complex, which warrants a fair about of explanation. The screen itself can be broken down into 2 categories: (1) the scoring data, and (2) the buttons which provide some kind of action for the user.
The scoring section of this screen is further broken down into 5 components: objectives, status, points, time completed, and totals. The objectives column lists a set of objectives summaries that the user was required to complete for this level. In the screen below, the user was required to switch between instruments a total of 3 times. The status column indicates whether it's respective objective was completed or not. This is indicated by the text, “pass” or “fail.” The point's column also indicates the points that where accumulated for each respective objective. If an objective was not completed, then no point value is shown. The specific point value for each objective is a function of the time that has elapsed either since the beginning of the song or since the last transition in this case. The time completed column indicates the time that has elapsed since either the beginning of the song or the end of the previous transition. Finally the totals section indicates the total points accumulated, and the total time respectively. If the user successfully completes all objectives for this level, the total time will be shown corresponding to the total length of the composition in this case.
There are 4 buttons which provide various functionalities for the user in the statistics screen: “Retry Level,” “Save Track,” “Next Level,” and the “back to Main Menu” button. The retry level button does exactly what it's label implies; it allows the user to retry the level they have just played. The user is able to retry the level whether they have actually passed the level by completing the indicated set of objectives, or not. The thinking is that in this manner the user is able to maybe achieve a higher score for this level even though they may proceed to the next level. The save track button allows the user to save their composition on the local file system (see figure 6, including documentation below). Upon clicking the next level button, the user is taken to the following level to attempt to finish a new more complicated set of objectives. Finally, the last button allows the user to return to the main menu if desired.
Save Screen
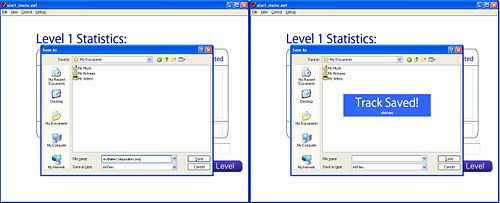
Once a user has finished viewing their score for the recently completed level, they may elect to save their composition to show off to their friends and family. This is achieved by clicking the save track button on the statistics screen. From here, the user is prompted with a familiar save dialog corresponding to the operating system (figure 6). The user must enter a name for their composition and click save. Upon clicking save, a confirmation dialog is presented to the user to notify that the track was in fact successfully saved.
Quit Screen
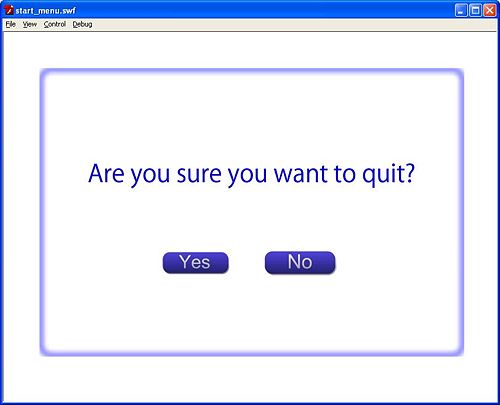
Finally, the quit dialog is very straightforward (figure 7). The user is presented with a screen that details if the user would is sure they would like to quit or not. Upon clicking yes, the flash application will exit. Otherwise, upon clicking the “No” button the user is returned to the previous screen.
Tutorial Mode
The tutorial is a movie that explains how to play the game. Each screen explains a different aspect of the interface and gives the player a chance to try out all of the functionality. Features are hidden until just before their use to avoid confusion over unexplained controls. The points of interaction within the tutorial are made obvious with both written and visual cues.
Practice Mode
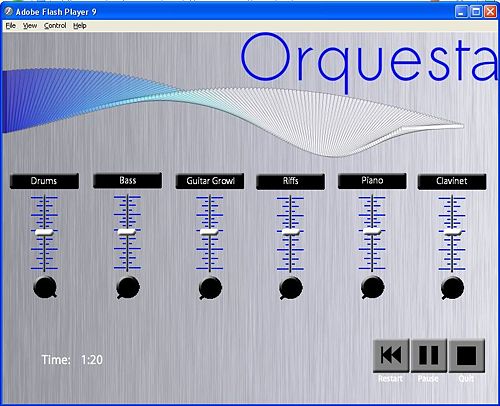
Practice mode includes a simplified interface that only includes the track controls. It is designed for experimentation with the system, without specific goals or scoring. It allows for mixing a full six tracks at one time.
Campaign Mode
Campaign mode follows a guided lesson plan, first introducing the player to the game, then incorporating more and more complicated lessons. Only level 1 is completed, but it demonstrates the scoring and objective system.
Track Controls
The track controls are used to switch in or out tracks and to set the volume of those tracks.
Timer Bar
Each level has a set time to accomplish the goals. Visual feedback is given in terms of digital display and a slider which fills as the game goes on. The limited amount of time helps the player appropriately balance the piece.
In Practice Mode, a time limit would not make sense, so instead the amount of time since the song began is shown.
Controls
The player is given controls to restart the current song, pause the game, or quit back to the main menu.
Score
The score is an indication of how much the player has done in a round. We reward more complicated songs because they give the player more experience mixing them.
Vinyls
As explained in the tutorial, a Vinyl breaks when a mistake is made, and to end a bad song before it gets out of hand, the level will be restarted when the last Vinyl breaks.
Objectives
The player has Objectives for each Campaign Mode level. If all the objectives are completed before the time is up, the player can advance to the next level.
What was left out and why
We determined that there is no functionality from our lo-fi prototype that will be left out in the interactive prototype. However, there are some things that we didn't implement in this iteration. For those features refer to the "Wizard of Oz Techniques" section.
Any wizard of oz techniques that are required to make it work
Saving & Importing Tracks
To allow us to focus on the actual interface of our application, and not squabble with back-end issues we chose to not fully implement saving and importing for this iteration. The screen that are shown above simply mimic the traditional Windows XP save & load interface. For import, a file is already preselected, and the user simply clicks open. A confirmation dialog pops up, and once clicked the user will be propelled into the Orquesta game interface. For save, the user types in a file name and clicks the
Scoring
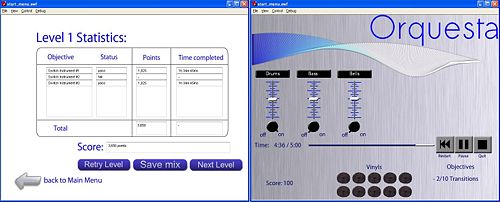
Traditionally, the user will attempt to achieve a set of objectives, such as making a set of transitions between tracks on beat. The failure to meet each objective results in a strike, shown on the right-hand screen in the image above. Strikes also represent a number of points lost for failure to meet an objective, such as making a track transition on beat. Each successful transition results in a number of points that are accumulated for the current level. The prototype of the scoring screen is shown on the upper left-hand screen.
In the interest of time, and to allow focus on the application's interface design, we choose to not completely implement the scoring mechanism. As it stands, the text on the scoring screen is static. Within the next iteration we will address verifying objectives (such as transitions) and how precisely this will tie into the overall score at the end of each level.
Grading
The report and prototype will be graded together, and the presentation will be graded separately. Here is the grading for the report and prototype (60 pts total):
Design (20 Points)
- Tasks (3 pts)
- Do the tasks cover the interesting features of the project?
- Do the tasks have an appropriate difficulty/complexity specified?
- Do the tasks altogether form a compelling story for the project?
- Changes (5 pts)
- Were appropriate changes made to address the important problems discovered?
- Are these changes well illustrated with screenshots or scripts?
- Transition from low-fi to interactive prototype (12 pts)
- Were the limitations of the low-fi addressed?
- Were appropriate constraints from the mobile device considered?
- Were any non-standard interactions described and justified?
Prototype (20 pts)
- Is the prototype accessible and working?
- Can users complete the three tasks with the prototype?
- Were appropriate tradeoffs made between functionality and completeness?
- Are the limitations and tradeoffs described and justified in the report?
- Does the README file summarize these limitations and any other details needed?
Report (20 pts)
- Writing
- Does the report cover all the topics in the outline?
- Does the organization follow the outline?
- Are sub-sections used for easy scanning of important parts?
- Screenshots and Storyboards or Scripts
- Are important figures referenced and placed inline with the text?
- Are they clearly annotated (i.e. with explanatory captions)?
Presentation (25 pts)
The presentation grading will be broken into two components: a grade for the design of the presentation itself and grade for the information conveyed in the presentation. The grades for each of these components are explained in more detail below. Other students in the class will be grading you and a large part of this presentation score will be determined by them.
Design of Presentation (15 pts)
- Suggested Organization
- Overview
- Overall problem
- Representative tasks
- Overall UI idea including design changes from the previous iteration, rationale behind changes
- Summary
- Presentation
- Use slides. Ensure that the presentation shows appropriate preparation, and that visual aids are effective, properly prepared, and properly employed. Try to replace text with images wherever possible. Make sure text is not too small.
- Cover the required scope within the 10 minute time period. Practice and time your presentation.
- Ensure the presenters make eye contact with the audience and project well.
- Demo and Team Work
- The most common mistake in CS160 presentations is the trying to demo while speaking. One person in ten can do this effectively. Most lose the audience. Have one person do the demo while the other speaks. Practice coordination.
- At most 3 people from your group should speak during the presentation. There isn't enough time to switch between all group members. However all group members should be prepared to answer questions.
Information in Presentation (10 pts)
- Representative Tasks
- Did they provide coverage of the functionality?
- Were the tasks too easy or too hard?
- User Interface
- Was the interface novel and creative?
- Was it appropriate for the supported tasks?
- Does it follow from the task analysis, low-fi prototype, and other sound reasoning?
- Presentation of Functionality
- Was enough functionality presented to illustrate the representative tasks?
- Was enough presented to give a flavor of the interface?
Presentation Dates and Order
Giving Presentation Feedback
During each of the two days you are not presenting, you will be assigned to help grade one of the other groups that is. This is an opportunity for you to think critically about the design process and provide valuable feedback to the other students in the class, so take it seriously.
After we have determined the presentation dates for each team, we will post a list indicating which teams you'll be responsible for grading. On the day of the presentations we'll provide you with printouts with which to score other students and give feedback both on their project and on their presentation. The grades you give other groups will be kept anonymous, but your written feedback will be returned to the group. This will be an individual assignment and will count towards your participation grade for the course. You should plan on coming to lecture all three days!
Schedule
Monday:
- Group: Orquestra
- Group: Lucky Seven
- Group: Phi-tus
- Group: BuTtErFlY
- Group: !Xobile
Wednesday:
- Group: 1 3 3 7
- Group: TBD
- Group: Group Ate
- Group: 4
