InteractivePrototype-Group:Group Phi-tus
From CS 160 Fall 2008
Contents |
Each team member’s name and role in this assignment
- Kevin Friedheim - Implementation and back end work of prototype.
- Frank Yang - discussion of changes needed, write up for Interface Design Revisions, Wizard of Oz techniques
- Xuexin Sean Zhang - Graphics of prototype
- Haosi (Jason) Chen - Write up for Task, Overview of UI implemented, and What was left out and why.
- Juan Padilla - Implementation and back end work of prototype.
Introduction and mission statement
We are implementing a game design that requires participants to converse in the language they are trying to learn a foreign language. Our interface currently is very generic, and therefore flexible and so we plan on modeling our user interface based on interviewee's feedback. The purpose behind the project is to determine if by mixing fun with learning, the product of such game-play is an edification that could not be obtained by studying alone in the same time frame. By placing users on different teams within the game, a competitive edge is given which drives users to not only draw upon existing knowledge of the language that is being learned, but it also drives users to build on this knowledge.
Mission Statement: Our mission is to facilitate for our target users (individuals trying to learn or otherwise master a foreign language) the process of learning by fusing this process into a fun game. We plan to do this by using our version of a blend of Pictionary®/Taboo® types of games -- as it would apply to learning a language. Our research has shown that the vast majority of the language-learning process involves verbal communication in the language in question. Our goal in this design is to bring this "best" aspect of learning into an environment where participants will try very hard to both speak and comprehend the language.
Tasks
Rate the drawings (easy task):
The user is simply presented with a screen showing all of the drawings that have been submitted from the last round with a set of an unfilled stars used to perform the rating under each drawing. therefore, the user must simply hover the input device over the stars and once the amount of the stars is “filled”, the user then clicks to lock in the result. The user repeats this process over the number of drawings then selects the submit button for the results to be tallied.
Create a new game (moderate task):
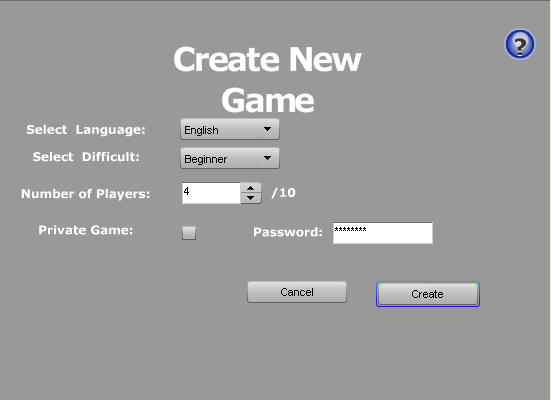
Game creation was chosen as our moderate task because it requires the user to interact with elements not used in other parts of the game; namely, the information form that is presented to users in order to choose the basic parameters of the game such as language and difficulty level. This form is reached by selecting the “create a new game” button form the main screen. Once here, the user chooses the game’s parameters, which are mainly guided through a set of drop down menus for easy setup. Once the user is satisfied with their choices they can click the “create” button and are then taken to the waiting room where they await other player to join their newly created game.
Draw a picture (difficult task):
The screen we used is very simple and familiar to that of most drawing programs such as Photoshop but not nearly as robust. The task simply requires the user to select the mostly familiar tools in the left hand toolbar such as the shape or pencil tool and use them to draw a picture. The task of selecting the proper tools to create the desired effects was the crucial step for this task. Once the image is drawn, the user can either wait until the timer runs out or submit the picture early for possible bonus points.
Interface Design Revisions
Using the results from the low-fi interview, we decided to alter a number of features we originally had.
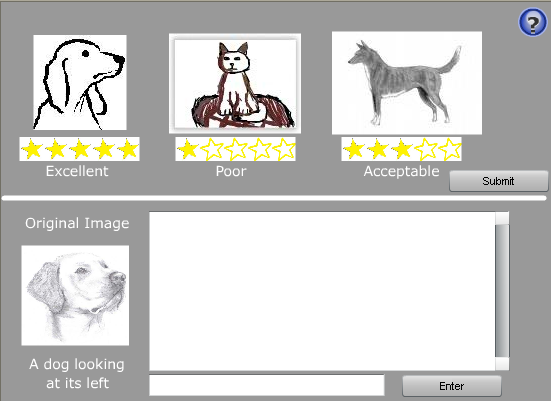
Rate the drawings: For this task, at the end of a round, we have dictators rate the pictures the drawers had just drawn in that round. The dictators were shown a screen that displayed the completed drawings with three stars underneath each drawing. To keep the ratings fair, the screen did not display the identity of the drawers. After the low-fi interview, we immediately decided to address the problem with the ambiguity of the stars. At the moment we did not have any cues as to how the ratings were to be completed. While we did have a help menu, it would have been extremely hard for the user to complete the task through exploration methods. Coincidentally, there were only three stars under the three provided drawings, which confused many of our interviewees as to whether the rating system was in fact a ranking system. In order to fix this issue, we are going to change the number of stars for the rating to a more relatable 5-star rating system. In order to prevent further confusion, a descriptive label was added when the cursor hovers over the number of stars to reflect the rating with words such as "Excellent," "poor," and "acceptable," as seen in the screenshot below. Furthermore, when there is a mouseover event on the stars, the stars to the left of the star that the cursor is hovering over will be highlighted, but not selected. When the user clicks, the highlighted stars will turn into a solid color to reflect the selection of the rating. The help button, when clicked, will still display the procedures for rating the drawn images, but we would like to keep the help button as a last resort for the user, if possible.
Create a new game:
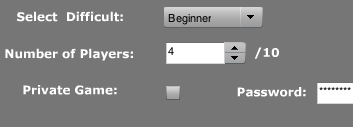
Our original design had the user input his/her nickname at the home screen, where the user can try to join or create the game. After the interviews, we decided to change this nickname creation implementation. As pointed out by a few interviewees, there was no way for the user to tell if the nickname would be accepted or not. There was no button that could be pressed to submit the nickname to the server, so many interviewees were worried that the nickname that they chose might have already been used had it been a fully functional prototype. To address this legitimate problem, we created a simple title screen to the game that had a field for the user to input his/her desired nickname and an "enter" button. The screen also now displays our game's name, as well as a brief tagline or description of the game. Another change we made was on the screen where the user would set the game settings. While most were dropdown menus, our original implementation had a text field for the user to input how many players would be needed to start the game. While it was mentioned in the help section, there was no other notification to the user of the maximum number of players that could be in a created game. In order to fix this problem, we changed the field from a text field to a field that can only be incremented and decremented by two. Although this forces the user to only increment and decrement by two each time, the user cannot increment past the number 10 or decrement past the number 4. Also, we added a simple "/10" after the field itself, seen below in the screenshot, to imply that the maximum number was indeed 10.
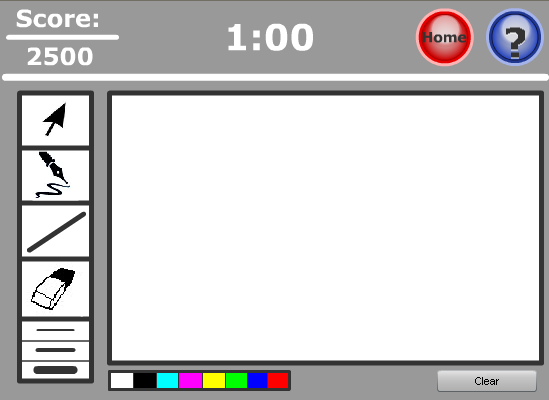
Draw a picture: Our original low-fi prototype was more or less functional in the hands of the interviewees in the sense that they were able to complete the task with relative ease. Most turned to the help button, which provided labels to the buttons that were available on the screen. However, like we mentioned before, our goal is to try keep the help button as a last resort for the user. We noticed during the interviews that many were confused by the line tool that we had. We decided that this was due to a misleading ruler icon that represented the tool. We quickly realized that while rulers are often used to draw straight lines, most users will relate to the act of measuring the length of an object when presented with a ruler. In order to fix the problem, we simply changed the ruler to a straight line angled upwards. While a straight line angled upwards may be less intuitive out of context, it should be sufficient given the context of a drawing application. We added a submit button to the drawer's screen so that when a drawer is done (or thinks s/he's done) the submit button can be pressed (assuming 60 seconds have not already passed). Our plan is to give additional bonus points for players who drew the winning picture and was able to submit before the time limit. By doing this, a sense of chance is added to the game in that any player could possibly draw a far superior image in the allotted time. Another change we decided to implement was the freeform polygon tool. It was brought to our attention that the location of the tool was a bit misleading. In our low-fi model, it was located in a submenu of the rectangle tool, which contained other shapes such as the oval and star tool. The shapes would theoretically be created with a click and drag motion which is fairly intuitive. However, the freeform polygon tool, as set by standards before, would utilize multiple point and clicks in order to create the desired shape. On top of this awkward placement, we found many interviewees question what the tool's function was, but avoided using the tool itself. After considering the time available for the drawer to complete the drawing, we felt that it would be best to simply remove the freeform polygon tool. By removing the tool, the drawer would be able to avoid the time wasted in the confusion of the tool. Furthermore, we decided to add the tool that allowed the drawer select the "size" of the pencil tool. While this may not seem like a necessary add, by allowing the drawer to choose the width of the pencil tool, the drawer will be able to draw bold lines or small accurate details without sacrificing time retracing lines to make it bolder. Since the toolbar will be placed below the eraser tool, the drawer will be able to access the tool at all times when the pencil tool is selected.
We also decided to change the location of the color palette that we had provided the user. Before, it was located in the toolbar with the other drawing tools, and the drawer would have to click on the color icon for another menu with the palette to choose from. However, given the short time frame for the drawer to actually draw, the additional menu would be precious time wasted. To address this problem, we moved the color palette to the bottom of the screen, accessible to the drawer at any given time, as seen in the screenshot below.
Prototype Overview
Overview of the UI implemented
create/join a new game
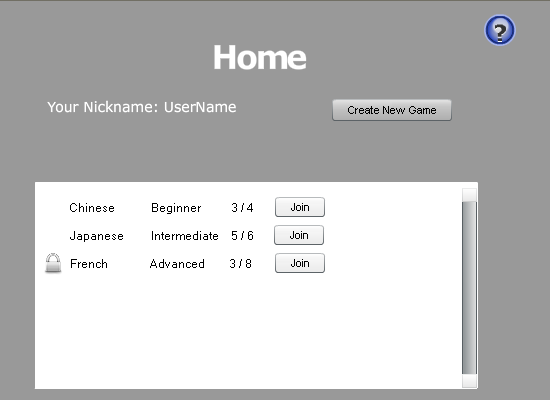
After the user type in their username and password to enter the game, the Home screen will appear.
User can join a existing game from the game list by clicking the join button next to the game. The user creates a game by clicking the "Create New Game" button, then the user will be brought to the create game screen.
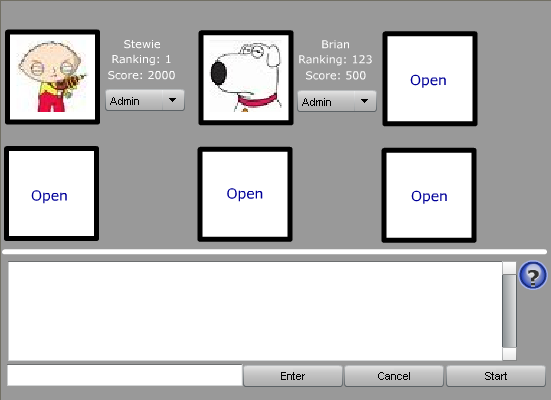
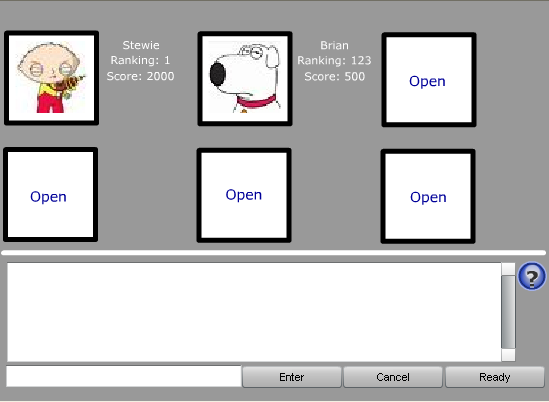
In the create new game screen, player will be able to select language, difficulty, number of player and decide if they want to create the game as private. If the "Private Game" check box is selected, the user will be asked to input a password in order to create a game. Other players that wish to join the private game will need to input the same password in order to successfully join. By clicking the Create button, the user will brought to the waiting room screen showing below to wait for other player to join. In the waiting room, it will show the players name, ranking and score. Also, the user that creates the game will automatically assign to be the admin of the game, and he/she will have the ability to kick other player. Admin start's the game by clicking the "Start" button locate at the bottom right corner when all the player are indicating ready. The player will be brought back to the Home screen by clicking the "Cancel" button.
right below is the screen for the player that joins a existing game from the game list.
draw/dictate a picture
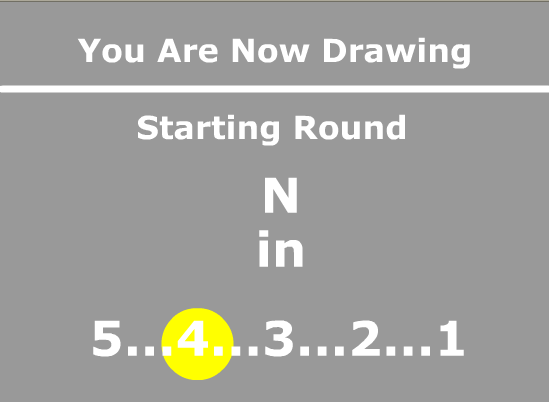
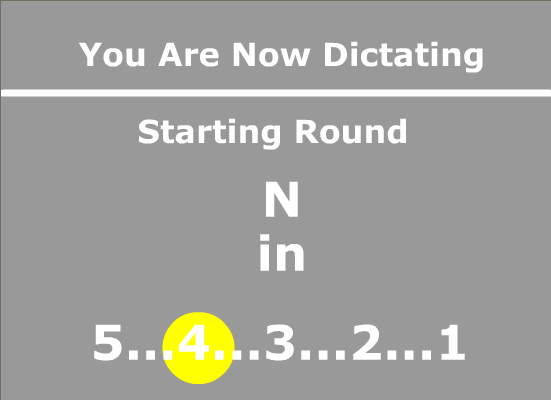
After the game start, the system will randomly choose players to be the dictator and drawer, and letting the players know their role by the corresponding screen below. This role assigning process will repeat every time before a new round starts.
If you are assigned to be a drawer, you will get the drawer screen below. On the top part of the screen, indicating the score you have so far, timer, home button and the help button. Drawers can use the tools on the left hand side and picking between eight different color at the bottom of screen to draw what the dictator describe. By clicking clear, everything the drawer drew will be erased.
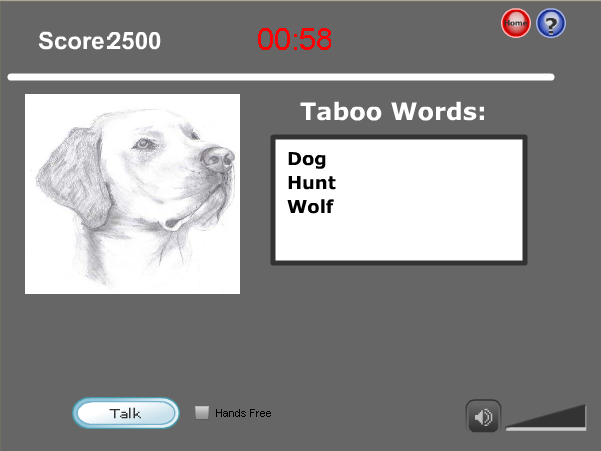
If you are assigned to be a dictator, you will get the dictator screen below. Mainly on the screen the player will be given a picture of an object, and a list of Taboo words that are forbidden during the game play. The volume controller will allow the player to adjust the volume.
rate the drawing
When the time is up, the rating screen will pop up automatically for the dictators.
The stars below the pictures are initially unfilled. Dictators can simply hover the cursor over the stars and once the amount of the stars is “filled”, the user then clicks to lock in the result. The corresponding descriptive label will show under the stars once the dictator click and lock the result.
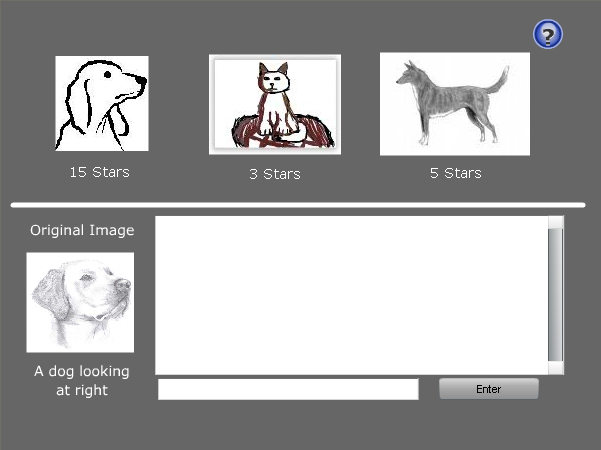
A screen similar to the dictator's rating screen above will be used to show drawers their drawn pictures and a dynamic update of current rankings of drawings so that the can see the progress that the dictators are making . Also, the drawers will be given the "answer" image and can chat with other drawers and talk about how right on or how far off they were with their own drawings.
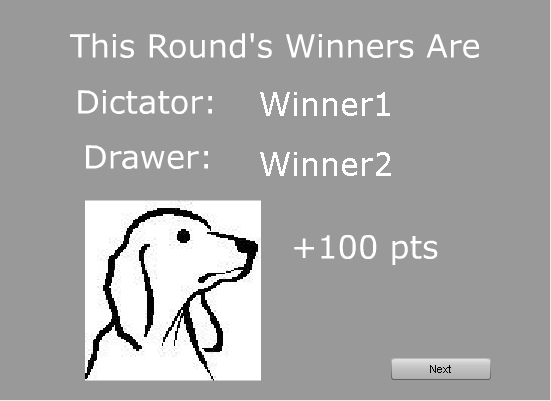
After all the dictators submit their ratings, the system will calculate the total number of stars each picture gets, then the result screen will pop-up indicating the corresponding drawer and dictator of the winning picture, and how many points the winners get.
What was left out and why
- Networking issues and saving the data of the user account.
- When a player drop out in the middle of the round, uneven number of player to continue the game.
- Some of the drawing features like the selection tool, the line tool, and the eraser tool. For the purposes of this interactive prototype, we felt that enough of the functionality that is key to usability of the prototype and the completion of the tasks that we've defined have been implemented.
- Sound control and communication buttons between the dictator and the drawer during game-play.
o why left out: We are focusing on implementing the functionality for player to accomplish the selected tasks. We left the networking issues and data saving to the Wizard of Oz techniques in this stage.
o why left out: Our team still debating how should we handle a exceptional case like this. Right now we are focusing on implementing the features for the game. It will be easier for us to ignore the exceptional cases in this stage.
o why left out:These tools require an implementation that is a bit over our heads in terms of our understanding of flash action-scripting.
o why left out: These tools are, at this point, a little bit too in depth for us to implement. For this reason we decided to "wizard of oz" these features until we can put them together in our final version.
Wizard of oz techniques
At this stage of our implementation, we focused mainly on the ability to complete the selected tasks that we had. Because of this, we left many of the complicated networking issues to the Wizard of Oz techniques. The plan of our game is for it to be a game that is played on the internet in an internet browser. Eventually, players will be able to create accounts that allow them to login and maybe eventually keep a list of friends. The player would then be connected to a central server where the games would be created and hosted. The server would also allow for various communication means that our game proposes, i.e. the chatting and transferring of audio. However, for simplicity, our current implementation is only the surface of the proposed game, and no server is implemented. Any occurrence of audio from another "player" or the appearance of other "created" games are all created with the Wizard of Oz technique. Any instance that requires the implementation of a server will actually be stored locally and only simulated.
link to downloadable .swf
http://www.2shared.com/file/4171435/42297c74/interactiveprototype_final2.html

